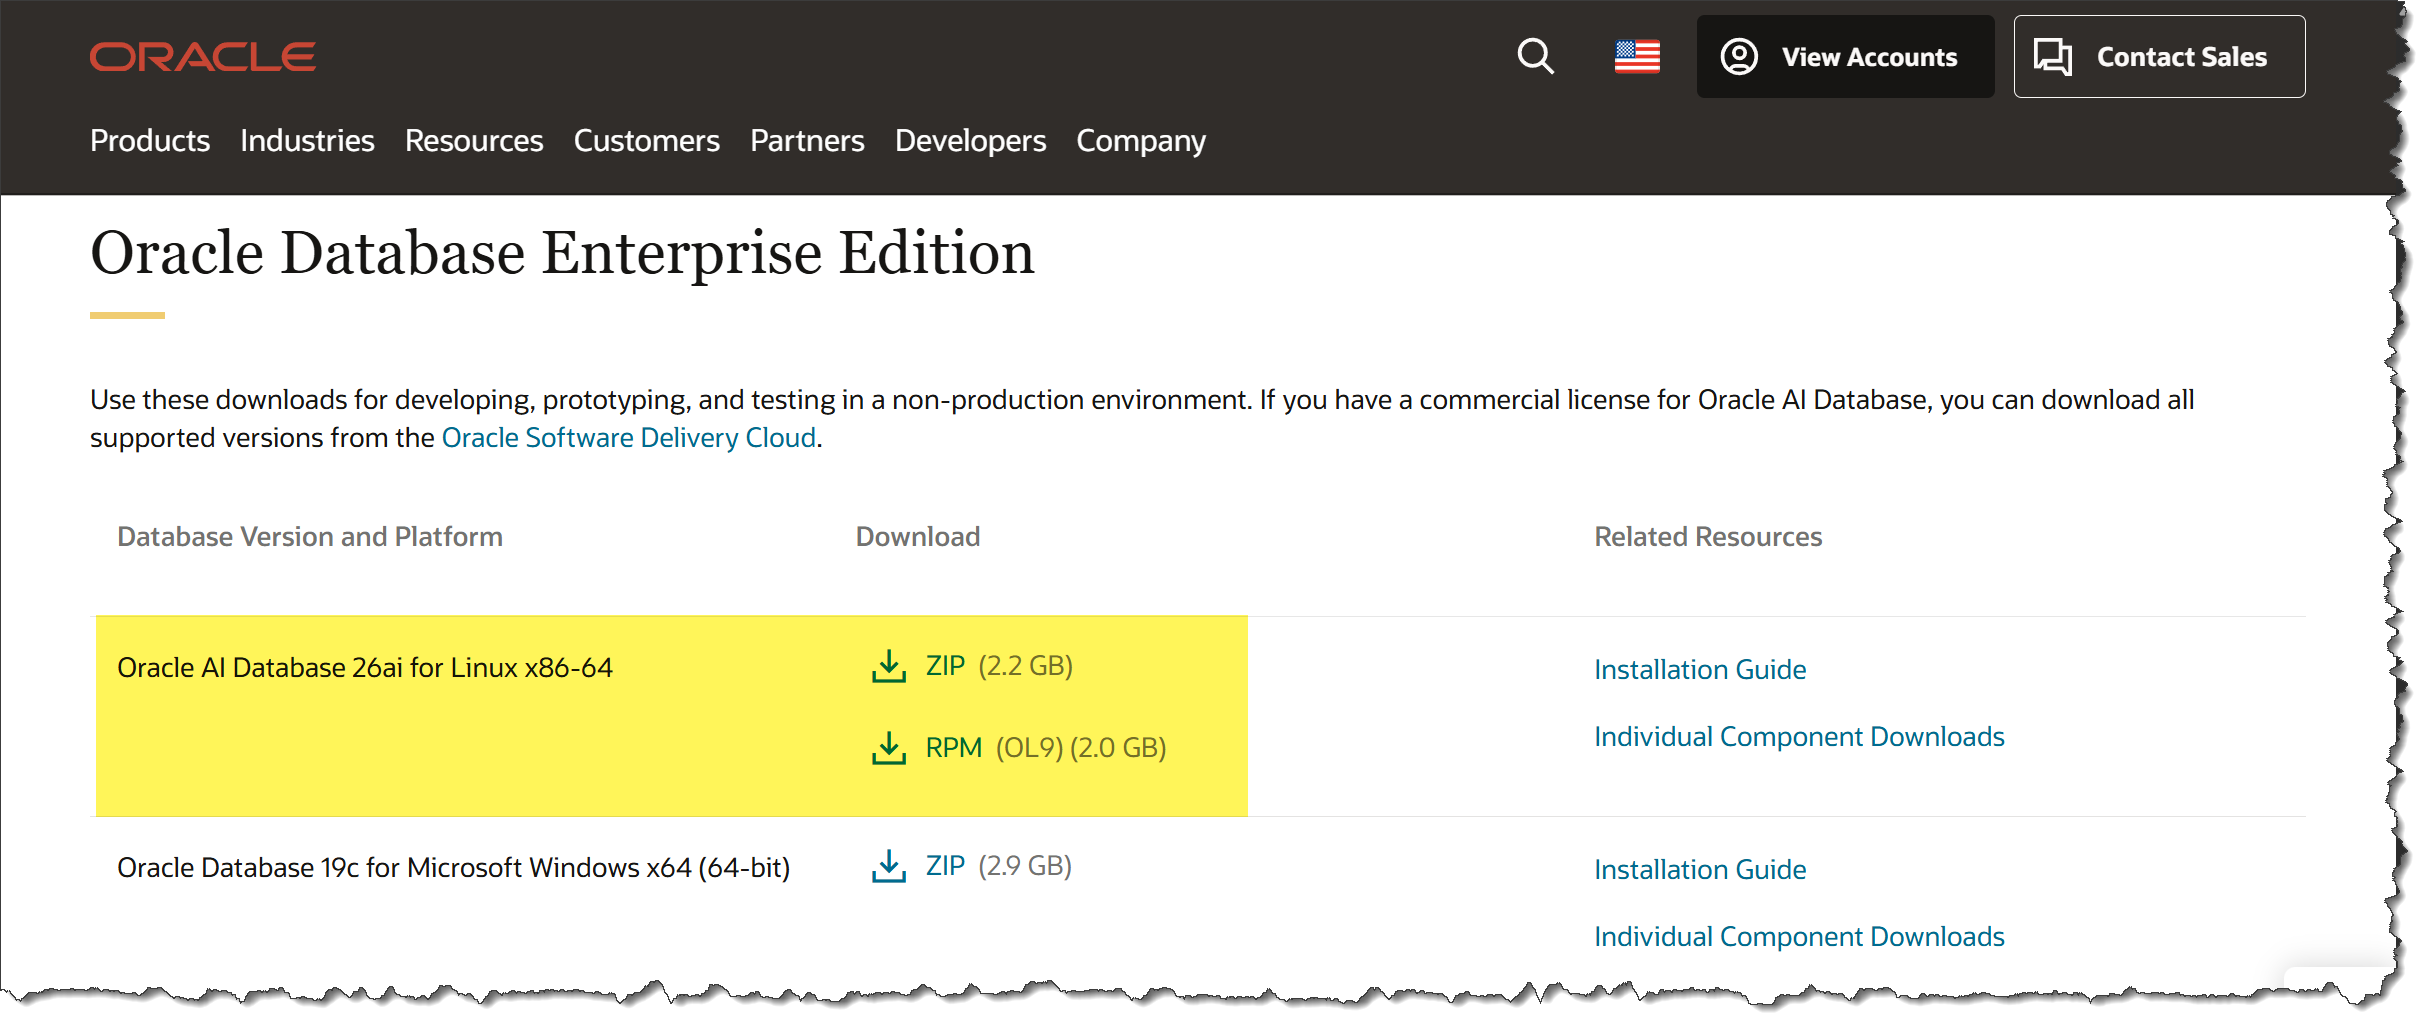
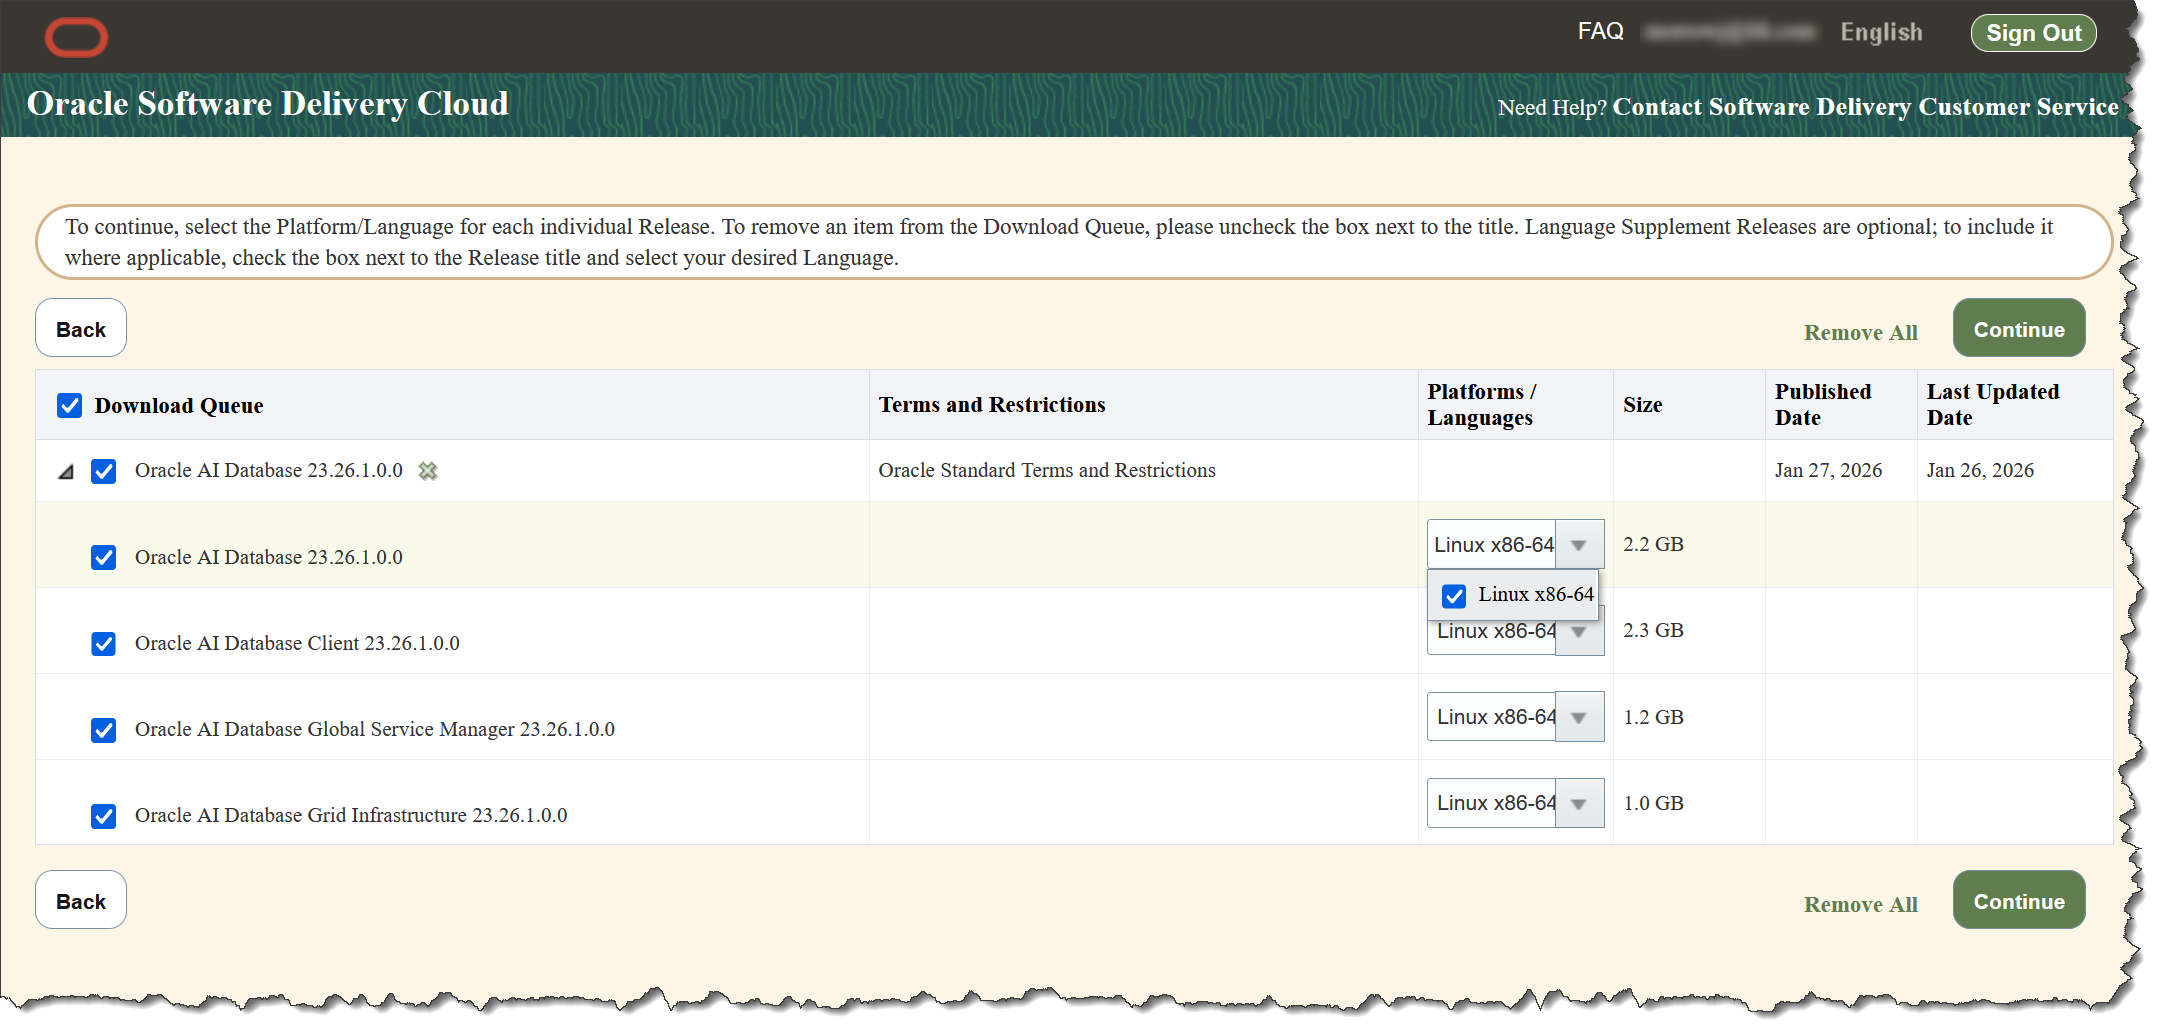
You can also find it at e-delivery.oracle.com (if you’re looking for the more “official” version).
Special note for E-Business Suite customers: While the EBS ATG group HAS announced certification of E-Business Suite R12.2 against 26ai for Exadata (which is, for many purposes just Linux x86-64), they haven’t officially announced certification for EBS R12.2 + RDBMS 26ai for on-prem Linux. I have reached out to ATG and confirmed that a separate certification announcement on-prem Linux x86-64 will be made on a future date.
Given that the two are extremely close, I would expect that announcement soon(ish).
For those of you who are set up to receive notifications when various MOS Notes are updated, you probably noticed a bit of activity in the last day or so. In particular, I saw MOS 1617461.1 (Applying the Latest AD and TXK Release Update Packs to Oracle E-Business Suite Release 12.2) was updated…. that took me to MOS 2525754.1 (Using UTL_FILE_DIR or Database Directories for PL/SQL File I/O in Oracle E-Business Suite Releases 12.1 and 12.2) where I saw the statement:
“Note: The minimum certified version of Oracle Database 23ai for Oracle E-Business Suite is Oracle Database 23ai (23.5.0.24.07). “
At that point, I became extremely excited. Wait, it’s certified now? Wow! So, I went to check out the EBS TechStack blog, where I saw the actual announcement:
I don’t have an Exadata in my basement. And RDBMS 23ai has still not been released for on-prem deployments. So, obviously, I can’t do much with it as of yet.
Here’s what I can do.
The announcement, even though it’s just for Exadata, brings with it a bunch of updated MOS notes. These MOS notes can provide us a preview of what we’ll have to do when it is, eventually, certified for on-prem deployments to other platforms.
In particular, take a look at:
Information Center: Oracle Database 23ai with Oracle E-Business Suite 12.2 (Doc ID 3018618.2) Interoperability Notes: Oracle E-Business Suite Release 12.2 with Oracle Database 23ai (Doc ID 2962871.1)
So, if you’re planning to upgrade your EBS R12.2 environment to use 23ai, take a look at those MOS notes. They will provide a basic roadmap to help you get ready. Some of the key items that you can do NOW in order to get ready:
Upgrade to RDBMS 19c if you’re not there already! [MOS 265589.2 is a good starting point]
Apply R12.AD.C.Delta.16 and R12.TXK.C.Delta.16 [MOS 1617461.1]
Additionally, review the patches mentioned in the EBS R12.2/23ai Interoperability notes [MOS 2962871.1]. I wouldn’t worry about applying any of the actual 23ai Interoperability patchs quite yet (it’s quite possible that patch could change or be replaced when the regular certification is announced). But, MOS 2962871.1 will still give you a good idea of where you need to be with other “normal” patches.
AS ALWAYS, when applying patches, be sure to test things in a non-production enviromnent before moving them into production.
And enjoy going down the EBS MOS Note rabbit hole… 🙂
EBS Customers are, by now, familiar with the “EBS Technology Codelevel Checker (ETCC)”. This tool, updated at least every quarter, can scan your EBS system and identify the necessary patches on top of your current PSU. The ETCC tool works on both the dbTier and the EBS appsTier. The output of the ETCC tool will also recommend a single patch bundle that you can download which will contain all of the necessary patches.
As always, you should download the current version of the tool as Patch 17537119. Rather than issuing a new patch with each update, here, they’re merely updating the same patch number, so always download the current one!
What’s new is that they’ve now produced a tool that does the same thing for the various Java installations in your EBS environment.
This new tool is the EBS Java Critical Patch Update Checker (EJCPUC)
Released along with the October 2024 CPU (and, I presume every quarter), the patch for this one is 37171025.
In order to use it, here’s what I do:
Extract the zip file:
mkdir EJCPUC
cd EJCPUC
unzip ${DL}/p37171025_R12_GENERIC.zip
chmod 750 *.sh
Set your environment and run the script:
./ejcpuc.sh
Here is a sample of the output from the appsTier of my lab environment:
##################################################################################
## Checking Apptier Java 7 for CPU 2024.10 on Platform Linux_x64 - need 1.7.0_441
## 2024-11-01 13:25:26 CDT  on  ebsap1
##################################################################################
 2024.10        action  Your Version    bitness Java Location
 ------------   ------  ------------    ------- ---------------
 1.7.0_441      UPDATE  1.7.0_351       32-bit  /oracle/EBSDBA/fs1/EBSapps/10.1.2/jdk/bin/java
 1.7.0_441      UPDATE  1.7.0_351       32-bit  /oracle/EBSDBA/fs1/EBSapps/comn/util/jdk32/bin/java
 1.7.0_441      UPDATE  1.7.0_351       64-bit  /oracle/EBSDBA/fs1/EBSapps/comn/util/jdk64/bin/java
 1.7.0_441      UPDATE  1.7.0_351       64-bit  /oracle/EBSDBA/fs1/FMW_Home/webtier/jdk/bin/java

Follow 1530033.1 to update the JDK(s). Your application tier JDK 7 is lower than the 1.7.0_441 update released in CPU 2024.10.
Here is a sample of the output from the dbTier:
##################################################################################
## Checking DB tier Java for CPU 2024.10 on Platform Linux_x64
## 2024-11-04 08:34:21 CST  on  ebsdb1
##################################################################################

## Check Database Version
##################################################################################
Your database version is 19.23.0.0.0
         ORACLE_HOME     /oracle/EBSDBA/19.3.0
         ORACLE_SID      CDBDBA
         ORACLE_UNQNAME  CDBDBA

## Check Java Version of OJVM, Database JDK and EBS's appsutil JRE, need 1.8.0_421
##################################################################################
 Latest Version  action  Your Version  bitness Java Location
 -------------- -------- ------------  ------- ---------------
 1.8.0_431         o)    1.8.0_411      64-bit OJVM In database
 1.8.0_421         j)    1.8.0_401      64-bit /oracle/EBSDBA/19.3.0/jdk/bin/java
 1.8.0_421         u)    1.8.0_401      64-bit /oracle/EBSDBA/19.3.0/appsutil/jre/bin/java

o) Apply the Database Release Update (DBRU) recommended by ETCC which will update the DB OJVM version to the latest
j) Apply the Database Release Update (DBRU) recommended by ETCC which will update the DB JDK version to the latest
u) When the DB JDK version is updated to the latest - then follow section 3 of 1530033.1 to update this JRE
An EXTREMELY important part of working in IT is DOCUMENTATION. Yes, you need to know what you’re doing. But, I can honestly tell you, there are ALWAYS things that are going to be specific to YOUR installation. Yes, I know how to clone an E-Business Suite database from PROD –> DEV. But I would still have questions if I were asked to do it in your environment for the first time.
Different Types of Documentation
I would typically want to see a few different “types” or “categories” of documentation when being introduced to a new site.
Standard Documentation (should be reviewed/updated periodically)
Environment Documentation – Typically a network diagram (Visio) or similar sketch that would show me which servers are involved in each system. This would include servers and storage, of course, but also anything “special” that we have to consider when configuring things (load balancers? special firewall rules?)
Process Documentation – How do you perform backups? What is your cloning procedure? If you’re in a standby configuration, what is your failover procedure? How are code migrations handled?
Project Documentation
Documentation for Specific Efforts – Unless an effort is underway, you may not have this one. Here, I’d be looking for any documentation for a particular upgrade, platform migration, etc. It makes sense that this would be more of a “living” document. We did this in PASS0, here’s what we’re going to do in PASS1 and then again in PASS2, with revisions along the way…
My Tools
There are a few tools that I tend to use when producing my documentation.
SnagIT – Screen capture/notation Microsoft Word- Primary Documentation Format Microsoft Excel – Used mostly to compute timing and patch lists Microsoft Project – Used to help sequence steps in a large effort (upgrade/migration) Microsoft Visio – System/Network Diagrams, Process Flow Diagrams
There are, of course, alternatives. You might not want to purchase SnagIT, for example. If you’re looking for an open-source alternative, I’d suggest looking at GreenShot, which has most of the same functionality.
My Approach
First, you’ll notice that I do NOT create my documentation in Microsoft Excel. I know that it is pretty common for many DBAs, but I really despise this approach. I find the documentation very difficult to decipher and very difficult to follow.
Instead, I tend to produce a Word document. This approach provides a linear path through an effort. “Begin at the beginning,’ the King said gravely, ‘and go on till you come to the end: then stop.” (the King speaking to the White Rabbit in Alice in Wonderland).
Your documentation should NOT require in-depth knowledge in order to be followed. My intent, is that any reasonably-skilled Oracle EBS DBA should be able to follow any documentation I produce. This means that I try not to make very many assumptions. I will generally assume that they know how to run a script using the sqlplus command line, know some basic Unix/Linux commands, and have a basic understanding of some of the EBS tools. But that’s pretty much it.
Getting Started
The PRIMARY thing you’ll want is a good Microsoft Word Template. A Word Template is basically just another document. Only real difference is the way that you save it (and where you save it). Start out by creating a new document using the normal “Blank Document” template. Create your own styles and layout. But I find it useful to use the built-in “Heading 1” “Heading 2”, etc. styles for the most part. (You can modify them). The nice thing about the built-in heading styles is that they can be used to create a table of contents at the front of your document.
Key Styles in the Document Template
Headings – These would be the default “Heading 1”, “Heading 2” styles as mentioned above. I do modify them, however. I like to have each level numbered, this makes it easier to reference things in other documents or when building your project plan. It also makes collaboration easier (“Please do the steps in Section 4”, for example.). Code – This style creates a light blue shaded box with bold text and uses a fixed-pitch font (Courier or Lucidia Console, for example). This makes it easier to copy/paste (and understand) various operating system level commands in the process. Note – This style creates a pink box with BOLD RED text. Here we will point out important things and/or warnings about items that might have “bitten” us in previous iterations. Editor – This style creates a green box with BOLD text. I use this for various “notes to myself” about things to adjust going into subsequent iterations.
Key Sections of the Document Template
Cover/Title Page – Simple top sheet with basic information about the author, client, consulting firm, purpose of the document. Table of Contents – Simply insert a Table of Contents using the References ribbon in Word. It can be generated automatically based on the headings in the document. Document Revision History – Simple MS Word Table to track changes Body of the Document – Where we record the various steps/commands/timings/comments about the process. Reference Documents – This is a simple table with only two columns. DocID and Title. I use this to keep track of the various MOS notes that were used when researching the effort. By putting it into a table and dividing things into these two columns, it’s simple enough to sort and remove any duplicate entries.
TURN OFF AUTOCORRECT/AUTOFORMAT!!!
One of my BIGGEST complaints about Microsoft products is that they try to do too many things FOR me. Because of this, they frequently do them wrong. One of those things is “Autocorrect/Autoformat as you type”. This REALLY gets in the way of my documentation.
So, we’ll want to turn many of these items OFF.
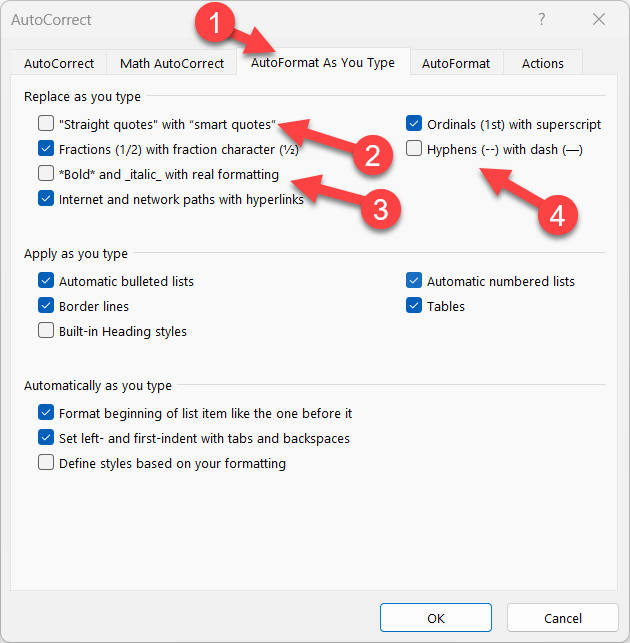
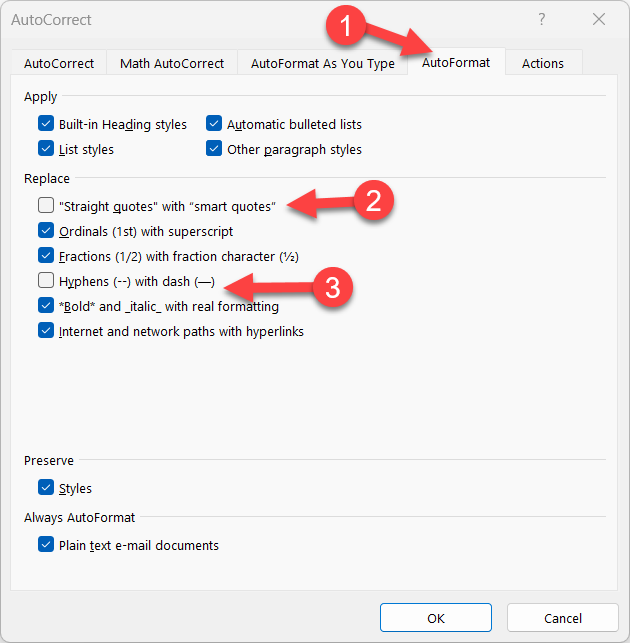
In Word, go to File –> Options –> Proofing –> AutoCorrect Options…
There are TWO tabs you’ll want to update. “AutoFormat As You Type” and “AutoFormat”. In particular, you’ll want to turn OFF “smart quotes” and replacing hyphens with dash. Those two items will interfere with the various commands you’re trying to document and won’t work if someone uses copy/paste to execute them.
Making it a Template
Once you’ve created your basic document layout, save it as an actual template using File –> Save As and use the “Word Template (*.dotx) format. You’ll want to save it into your Templates directory so that it is easy to use for new documents.
Actually Writing the Documentation
Start with a fresh document using the template you created above.
Edit the cover page and revision history.
I also like to include an “Overview” section at the top of the document where I describe the basic concepts of what we’re trying to accomplish. Sometimes that may include various diagrams, etc. to get the point across.
Include references in the section headers that indicate which MOS document this step comes from and where (which server/environment) it should be performed on. For example, “MOS 12345.1 [dbTier]” or “MOS 12345.1 [appsTier RUNFS]”.
Use the Code style for the actual commands that need to be typed. Pay attention to line breaks (use the Unix “\” line continuation character followed by an “enter” if necessary).
NEVER include actual passwords in the document unless they are generic. Instead, define certain environment variables in a section near the top of the document and reference those instead.
Then, when you need to use those variables later, they should be available.
. ${HOME}/apps.env run
cd ${ADMIN_SCRIPTS_HOME}
{ echo "APPS"; echo ${APPSPW}; echo ${WLADMIN}; }|./adstpall.sh -nopromptmsg
Make use of standard variables wherever possible. This would include things like ${ORACLE_HOME} and ${ORACLE_SID} on the dbTier, but also ${APPL_TOP}, ${RUN_BASE}, ${ADMIN_SCRIPTS_HOME}, etc. on the appsTier.
Try to use commands that will do things in a robust manner. It is entirely possible that someone might try to do a step twice. Take that into consideration. Instead of outright deleting something, rename it. (You can go back and delete it later). For example, if you’re doing an upgrade from 12c to 19c, if you rename the 12c ORACLE_HOME to “12.1.0.2.DEL”, any references to it would be sufficiently “broken” but the files are still there for you to reference later on.
Make backups before editing critical files. I tend to use a date/timestamp to create the backup file. There are several advantages to this approach. The most obvious being, you now have a backup. But you also have a “before” file that can be used to troubleshoot things (a simple “diff” can tell you a lot). An example of a backup would be:
Keep track of timing. There will be a lot of steps that only take a few seconds or a handful of minutes to execute. But, for anything that takes more than 5-10 minutes, I try to record a “start/stop” time and calculate an “elapsed” time at the end. Not only does this give the reader an “idea” about how long a task will take, it can help you to plan that production outage later on.
Text (ASCII) Things. You may want to include the output of a particular command in the document. ETCC, for example, produces some out put that is particularly useful in documentation. For this, I tend to copy/paste the text into the document and use the code style. You might also want to highlight certain sections that are important. If you’re including the output of something interactive (adcfgclone.pl, for example), it would make sense to identify any “responses” you provide highlight (in yellow) and use bold on those portions. In most cases, I do NOT recommend taking a screenshot of a terminal window. (Graphical images aren’t searchable and can make a document large and unwieldy, I try to avoid those wherever possible).
Graphical Things. As I mentioned above, I typically try to avoid including graphical images in the document. But, there are some situations where they make sense. For those, be sure to paste in any screenshots for steps that need to be performed using a GUI tool (RapidWiz, WebLogic Console, dbca, dbua, etc.). Use SnagIt, Greenshot, or a similar tool to capture only the necessary windows. With those tools, use arrows, highlighting, and other notations to indicate anything that needs to be done on that particular screen. Sometimes, it might make sense to number the various fields and include a numbered list explaining things below the image when you paste it into the Word document.
Other Things…
I mentioned Microsoft Excel earlier on. Personally, it’s a horrible tool for documenting things. If you really need something in a large table format (one that doesn’t fit well into a table within a document), then go to Excel. It works well for me when I’m doing patch dependency research, for example. But please, don’t use it for documentation.
The other thing that I mentioned was Microsoft Project. For me, it’s useful to produce a GANTT chart of the DBA portion of certain efforts. Upgrades, platform migrations, large patching efforts, etc. can all benefit from this. The main advantages to me are that it allows me to map out certain dependencies between tasks and also allows me to plan for certain items that might be long-running. For those, I can map out when it CAN start and when it MUST finish. This knowledge can be important in working to make the overall effort more efficient. The Word document is about the steps. The GANTT chart is about minimizing downtime.
Updating the E-Business Suite context file, particularly on the appsTier, is a fairly common exercise for an E-Business Suite DBA. You might need to do it as part of cloning, or just implementing things like Java Web Start and SSL/TLS.
One challenge, however, is that the context file is somewhat fragile. Make the wrong typo, and you could spend a decent amount of time trying to fix things.
The typical method for updating the context file is to simply open it up in your favorite editor (that would be vi on most Unix/Linux systems) and make the changes directly.
The recommended method, is to login to EBS and use Oracle Applications Manager to make the change. Unfortunately, this assumes that you want to (or can) start the applications to make the change
But what I told you that I found a better way to do it?
So, here’s the story.
A couple of years ago, I was setting up an Oracle VISION Demo Virtual Machine. For those who might not know, Oracle has pre-built Virtual Appliances with the E-Business Suite VISION Demo that you can download and run in a VirtualBox VM. (The instructions for The R12.2.12 can be found in MOS 2933812.1).
When you boot up that virtual machine and login for the first time, you’re prompted to answer various questions that are fed into a script which completely reconfigures the system.
When I first saw that I though, oh, this is neat… I wonder how they’re doing this? Turns out, it’s largely a collection of Linux shell scripts and perl scripts. So I started digging further. What I found was that they were using a java routine to edit the context file.
Based on that, I’ve developed this script to do those edits.
It’s important to note that this script is simply a “wrapper” that calls a standard tool that is already included in the Oracle E-Business Suite installation.
In order to run the script, use the syntax:
./update_ctx.sh ${CONTEXT_FILE} token "value"
For example, let’s say you want to update the value for the s_display token:
The script will make a backup of the context file, perform the update, and show you a “diff” between the two. It is written to run on the appsTier (which is where we tend to be making edits). The script supports R12.1.3 and R12.2.
#!/bin/bash
#
#   Update Context File for EBS R12.1 or R12.2
#
#	James J. Morrow
#	BlueStone Solutions Group, Inc.
#
#	01-Nov-2023	JJM	Updated to include R12.1 Syntax
#

export DTTM=`date +%Y%m%d-%H%M`
export CTXFILE=${1}
cp ${CTXFILE} ${CTXFILE}.${DTTM}

#
#	Determine EBS Version from Environment
#

if [ "${FILE_EDITION}x" == "x" ]; then
	echo -e "\nUsing syntax for EBS R12.1\n"
	export VER="R12.1"
else
	echo -e "\nUsing syntax for EBS R12.2\n"
	export VER="R12.2"
fi

update_ctx()
{
	#
	#	From EBS VISION VM, /u01/install/scripts/configwebentry.sh
	#
	if [ ${VER} == "R12.2" ]; then
		#
		#	EBS R12.2.x syntax
		#
        	echo -e "INFO:  Setting ${TOKEN} to ${VALUE}"
        	${COMMON_TOP}/util/jdk32/jre/bin/java \
        	-classpath ${COMMON_TOP}/java/classes:${EBS_ORACLE_HOME}/shared-libs/ebs-appsborg/WEB-INF/lib/ebsAppsborgManifest.jar  \
        	oracle.apps.ad.context.UpdateContext ${CTXFILE} ${TOKEN} "${VALUE}"
	elif [ ${VER} == "R12.1" ]; then
		#
		#	EBS R12.1.x Syntax
		#
        	echo -e "INFO:  Setting ${TOKEN} to ${VALUE}"
        	${COMMON_TOP}/util/jdk/jre/bin/java \
		-classpath ${COMMON_TOP}/java/classes:${COMMON_TOP}/java/lib/appsborg2.zip \
        	oracle.apps.ad.context.UpdateContext ${CTXFILE} ${TOKEN} "${VALUE}"
	fi
}

echo -e "\nUpdating CONTEXT_FILE\n"

export TOKEN=${2}
export VALUE="${3}"
update_ctx

#
#	Show before/after
#

echo -e "\nDifference between ORIGINAL and UPDATED context files\n"

diff ${CTXFILE}.${DTTM} ${CTXFILE}

echo -e "\nOriginal context file backed up as ${CTXFILE}.${DTTM}\n"
The script, as written, will only update a single token. If, for example, you’re working on an upgrade or a clone and need to update several, you could modify the script to do so. Just replace this section with a series of TOKEN/VALUE settings and call the “update_ctx” routine for each.
export TOKEN=${2}
export VALUE="${3}"
update_ctx
For example, maybe you need to update all of your Workflow Mailer settings. Replace the section above with values like what we have below.
Approximately once a year, typically in the fall, frequently at or near the time of a convention, Oracle announces the new releases for E-Business Suite.
Today is one of those days.
The actual announcement is available to the public here
For those with access to My Oracle Support, you can get more information through MOS 3012829.1. That document includes a link to the R12.2.14 RUP Patch [36026788] as well as a release notes for the patch itself and each of the included modules.
Oracle CloudWorld is happening right now in Las Vegas, NV. Tomorrow, at 9AM (Pacific), Larry will give his keynote address. Hopefully, he will announce the general availability of 23ai for on-premises systems. If that happens, I would look for an announcement from the Applications Technology Group about certification to follow shortly thereafter. For those of you paying attention to the ATG Blog, Elke Phelps posted a seven-part series to “tease” the upcoming certification.
I really don’t like answering prompts. It takes extra time, requires extra keystrokes, and makes documenting a process somewhat cumbersome. So, I avoid it whenever possible.
In the world of an Oracle E-Business Suite DBA, one command that we run quite often is adop. Unfortunately, the adop command doesn’t directly support command-line arguments for certain common things (passwords, in particular). So, here is what I tend to do:
First, I tend to manually assign the passwords to variables in my current session. The environment variables go away when the session ends. This also makes documentation easier.
A brief warning, though. I typically run the adop phase=abort command interactively as there are additional prompts that will need to be answered. Fortunately, I don’t have to do that quite as often…
There are a number of things that I do as part of my “process” that I find make my life a bit easier.
FINISHED block
There are a LOT of things that we do as an Oracle E-Business Suite DBA that can run for a long time. Because of this, we may have something running in another window and not realize that the command has finished. One trick that I use (mentioned in https://www.bluestonesolutionsgroup.com/?p=55) is to tail an ascii art file at the end of the command line. This serves a few purposes.
It is something of an attention grabber and makes an easy way to notice that the command has finished without needing to focus my attention on that particular window.
Using tail -f will, in many cases, prevent the shell from timing out and closing.
“Stacking” Multiple Commands on a single command-line
Unix/Linux allows you to “stack” multiple commands that will run in sequence. For example, while you might run three different commands (each on their own command-line):
date
ls -lat
date
They could be stacked into a single command line instead:
date;ls -alt;date
I do this quite a bit with the “date” command. This allows me to capture a “start” and “end” time for my documentation.
The one caveat, however, is that sometimes, the second “date” command will get fed into the command before and taken as a response to a prompt. So, test carefully.
The GNU Screen tool
GNU Screen is a package that can be installed on most Unix/Linux variants. The beauty of this tool is that you can detach an interactive shell session and re-attach it later on. While it’s detached, any commands that are actively running in that shell session will continue to process normally.
This is particularly useful if you’re on a network connection that might drop unexpectedly. Just re-connect, and re-attach the session.
There are situations where it makes sense to run an “empty” patch cycle in E-Business Suite R12.2. For example, I will run an empty patch cycle after a major operation (R12.1.3 to R12.2 upgrade, platform migration, etc.) to confirm that I can, successfully run a patch cycle.
The other “trick” that I tend to use is a tail.txt file to indicate when a process has finished. It is a simple ASCII text file that contains the following:
There are several ways to create it. I used to use the Unix banner command (which isn’t generally present on Linux systems). Because of that, the easiest way now is to use an online ASCII art generator:
By having tail -f ${DL}/tail.txt run at the end of a long command, it is pretty easy to notice when the process completes. This is particularly useful when you may have the window in the background, be running from a different machine, or maybe you’re just glancing at the screen from across a room.
As an example, let’s say you wanted to run an “empty patch cycle” as described in MOS 2316218.1:
IMPORTANT: Simply printing the FINISHED text block does NOT indicate SUCCESSFUL completion. Only that the command has finished. As always, be sure check for errors.